NOTE: For cleaning procedures, refer to “When
Required, Cleaning Primary Element,” in this section.
6. Install the clean primary element.
7. Clean and install the air cleaner cover. Close
latches (2).
8. Reset the air filter service indicator.
9. Close air intake compartment access door (1).
NOTE: If the air filter service indicator shows a
restriction after cleaning the primary element, have
Unit Maintenance install a new primary and secondary
element.
Inspect Secondary Element
NOTICE
Never attempt to clean and reuse a secondary filter
element.
The secondary filter element should be replaced at the
time the primary element is serviced for the third time.
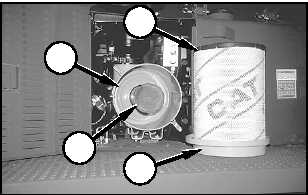
1. Remove air cleaner housing cover (4) and primary
element (1).
2. Remove secondary element (3).
3. Cover the air inlet opening. Clean the inside of air
cleaner housing (2).
4. Inspect the gasket. Have Unit Maintenance replace
the gasket if it is damaged.
5. Inspect secondary element (3) for plugging and
damage.
NOTE: If the secondary element is plugged with dust
or damaged, have Unit Maintenance replace the
element.
6. Uncover the air inlet opening. Install secondary
element (3).
7. Install primary element (1). Install cover (4).
Cleaning Primary Element
NOTICE
Do not clean the filter element by bumping or tapping
the element. Do not use a filter element with damaged
pleats, gaskets, or seals. Engine damage can result.
Make sure the cleaned filter element is completely dry
before installing it into the filter housing. Water
remaining in the element can cause false indications of
contamination in oil sampling test results.
NOTE: Primary filter elements can be cleaned with
pressure water at a maximum of 280 kPa (40 psi), or
detergent washing.
1. Direct water along the pleats inside and outside the
filter element.
NOTE: If the element is washed in warm water and
nonsudsing household detergent, rinse the inside and
outside of the pleats with clean water, and air dry the
filter element completely.
1
2
3
4
107
Maintenance Section
When Required
TM5-2430-200-10