TM 5-2350-262-20-2
4-858 Change 3
CAUTION
Do not strike roadwheel arm directly
with hammer. Failure to comply may
result in damage to equipment.
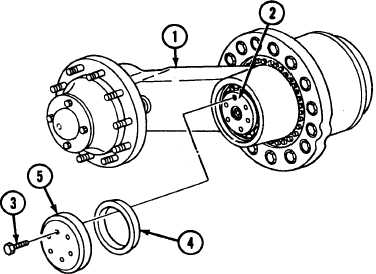
G Using wood block, install roadwheel arm (1) on
wingshaft (2).
CAUTION
Ensure only new self-locking screws
are used when installing roadwheel arm.
Failure to comply may result in damage
to equipment.
H Coat threads of six self-locking screws (3) with
lubricating oil.
CAUTION
Retainer mounting screws can loosen if
screws are not tightened at least two
times. Failure to comply may result in
wingshaft seal oil leaks.
Note
Perform steps K through U to install
roadwheels No. 2, 3, and 4. Perform steps
V through AO to install roadwheel No. 1
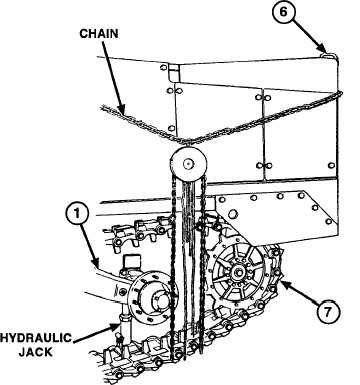
K Connect chain and chain hoist to rear lifting eye
shackle (6) and top of ejector or other suitable
location. Connect chain hoist to track (7).
L Using chain hoist, raise track (7) to gain
clearance for installation of roadwheel.
CAUTION
Place SPRUNG/UNSPRUNG lever
between positions. Failure to comply
may result in damage to actuators.
M Position hydraulic jack behind road wheel arm
(1), and raise roadwheel arm (1).
Note
Refer to appendix F for proper torque
sequence.
I
Install tapered ring (4), retainer (5), and six
self-locking screws (3) on roadwheel arm (1).
Tighten six self-locking screws (3) to 98-106
lb-ft (133-144 N·m).
J Wait at least fifteen minutes, then loosen and
tighten six self-locking screws (3) to 98-106 lb-
ft (133-144 N·m).


