TM 5-2350-262-20-2
4-818 Change 3
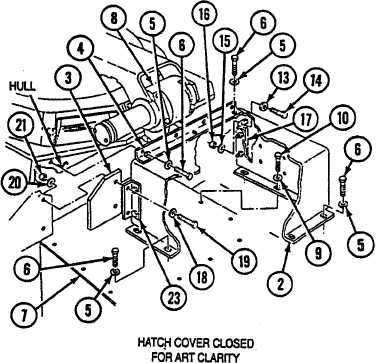
E Position armor plate (1) and radio equipment box
(2) against hull.
F Position armor plate (3) and radio equipment box
(2) against hull.
G Install bracket (4), fourteen washers (5), and self-
locking screws (6) on radio equipment box (2),
fuel tank armor plate (7), and hull.
H Open driver’s hatch cover (8) to full open position
(TM 5-2350-262-10).
Note
Helper will assist from inside driver’s
compartment with steps I through N.
I
Install three washers (9) and self-locking screws
(10) on radio equipment box (2) and fuel tank
armor plate (7).
Note
Perform step J if vehicle is MCS prepped.
J Install four washers (11) and self-locking screws
(12) on radio equipment box (2) and fuel tank
armor plate (7).
K Install two washers (13), screws (14), washers
(15), and locknuts (16) on bracket (17) and hull.
Note
Perform step L if vehicle is MCS prepped.
L Install washer (18), screw (19), washer (20), and
locknut (21) on bracket (22), armor plate (1), and
hull.
M Install two washers (18), screws (19), washers
(20), and locknuts (21) on bracket (23), armor
plate (2), and hull.
N Tighten all screws and locknuts to 32-36 lb-ft (43-
49N·m).
O Close driver’s hatch cover (8) (TM 5-2350-262-10).
FOLLOW-ON TASKS:
•
Install MCS unit (if equipped) (p 4-912).
•
Install hatch over holddown latch (p 4-318).
•
Connect negative battery cables (p 4-83).
•
Install portable dry powder fire extinguisher
bracke (p 4-213).
•
Install radio and radio mount (SB 11-131-2
or TM 11-5820-498-12).